Bài viết dựa trên hướng dẫn chi tiết của DeepStrike về kiểm thử bảo mật ứng dụng desktop Electron, bao gồm các vector tấn công thực tế, kỹ thuật phân tích và mẹo cấu hình an toàn.
Electron là gì?
Electron là một framework mã nguồn mở cho phép lập trình viên xây dựng ứng dụng desktop đa nền tảng sử dụng công nghệ web như HTML, CSS và JavaScript. Electron kết hợp Chromium (dùng để render giao diện) và Node.js (cấp quyền truy cập mức hệ thống) thành một runtime duy nhất, giúp lập trình viên web tạo ứng dụng desktop native-like mà không cần học ngôn ngữ đặc thù nền tảng như C++ hay Swift.
Electron đơn giản hóa việc phát triển ứng dụng bằng cách cung cấp một codebase thống nhất hoạt động trên Windows, macOS và Linux. Điều này có nghĩa là đội ngũ chỉ cần viết một lần và triển khai ở mọi nơi, giảm công sức bảo trì mà vẫn giữ được hiệu suất và giao diện native.
Trong những năm gần đây, đã có sự dịch chuyển lớn sang Electron vì nó搭建 nối giữa phát triển web và ứng dụng desktop. Trước đây, xây dựng phần mềm desktop yêu cầu ngôn ngữ và toolkit riêng biệt cho từng nền tảng như C++ với Qt, Objective-C cho macOS, hoặc C# cho Windows. Việc duy trì các codebase riêng biệt tăng thời gian, chi phí và độ phức tạp phát triển.
Electron đã thay đổi điều đó bằng cách cho phép lập trình viên sử dụng công nghệ web quen thuộc (HTML, CSS, JavaScript) để tạo ứng dụng desktop đầy đủ tính năng.
Từ kinh nghiệm bug bounty, các ứng dụng Electron xuất hiện ở khắp nơi nhưng API của chúng thường bị bỏ qua và hiếm khi được kiểm tra bởi hunter. Kẻ tấn công và nhà nghiên cứu thường tập trung vào UI hoặc endpoint web công khai, trong khi API ẩn hoặc nội bộ bên trong ứng dụng Electron bị phớt lờ. Đây là một cơ hội bị bỏ lỡ, bởi những API đó thường chứa các lỗ hổng nghiêm trọng.
Các thành phần cấu tạo của Electron
Main Process (main.js)
Chạy trên Node.js. Tạo cửa sổ, quản lý vòng đời ứng dụng, xử lý tích hợp native, file I/O, spawn process, logic cập nhật, và đăng ký IPC handlers (ipcMain).
Quyền hạn: có thể đọc/ghi file, chạy lệnh, truy cập OS APIs, đăng ký protocol handlers, và sign/verify cập nhật.
Renderer Processes
Mỗi BrowserWindow hoặc BrowserView chạy một Chromium renderer với HTML, CSS, và JS. Renderer UI và chạy logic client-side.
Ngữ cảnh thực thi phụ thuộc vào build: có thể có đầy đủ Node access (nodeIntegration) hoặc chỉ bề mặt API hạn chế qua preload bridge.
Preload Script (contextBridge)
Thực thi trước script của renderer page, trong một ngữ cảnh JavaScript đặc biệt. Thường dùng để expose API nhỏ, đã audit đến window qua contextBridge.exposeInMainWorld.
ASAR / Application Bundle
Code và assets của ứng dụng thường được đóng gói vào archive app.asar. Static analysis (trích xuất ASAR) là một trong những bước đầu tiên của pentest.
Auto-update Subsystem
Chịu trách nhiệm kiểm tra bản phát hành mới, tải artifact cập nhật, xác minh chúng, và áp dụng cập nhật với restart.
WebViews and External Content
<webview> nhúng nội dung web guest trong renderer process riêng. BrowserView gắn nội dung web vào cửa sổ theo chương trình.
Native Modules / .node Binaries
Native Node modules biên dịch thành .node binaries, tải native code nền tảng và phải khớp với Electron ABI và nền tảng mục tiêu.
Inter-Process Communication (IPC)
Truyền message giữa renderer và main sử dụng ipcRenderer.send, ipcRenderer.invoke, ipcMain.on, và ipcMain.handle.
Session, Cookies, và Network Layer
Electron expose Session API bọc networking của Chromium. Quản lý cookies, cache, proxy, và webRequest hooks.
Security Flags và webPreferences
BrowserWindow và webContents chấp nhận cài đặt webPreferences như nodeIntegration, contextIsolation, preload, webviewTag, và sandbox.
Ví dụ thực tế: Kiểm thử Simplenote
Để giải thích cách bắt đầu pentest ứng dụng Electron, tác giả sử dụng ứng dụng thực tế tên Simplenote – một ứng dụng ghi chú tương tự Notion nhưng đơn giản hơn.
Bước 1: Tải và cài đặt
Truy cập trang releases tại GitHub:
- Repository:
https://github.com/Automattic/simplenote-electron - Release:
v2.23.2
Tải gói Windows x64 (file exe) và cài đặt.
Bước 2: Định vị file ASAR
Mở Start menu, right-click shortcut Simplenote, chọn Open file location.
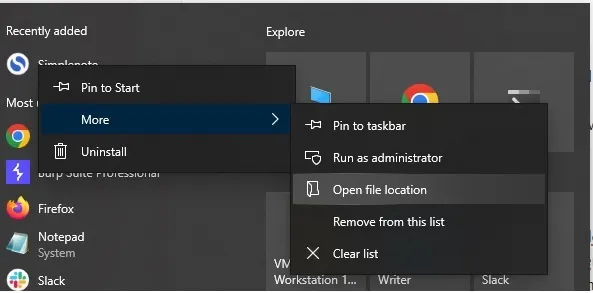
Right-click shortcut lần nữa, xem Target path để định vị thư mục ứng dụng. Trong thư mục resources sẽ thấy file app.asar.
File .asar là archive đóng gói toàn bộ source code JavaScript, HTML, và CSS. Giống .zip nhưng tối ưu cho Electron. .asar archives không mã hóa, chỉ đóng gói, nên nội dung có thể được kiểm tra.
Bước 3: Trích xuất ASAR
Cài đặt tool asar:
npm install -g asar
Kiểm tra usage:
asar -h

Trích xuất:
asar e .\\app.asar reverse
Mở thư mục reverse để xem file đã trích xuất. Nếu developer bundlevà minify code trước khi đóng gói, file trích xuất sẽ phản ánh artifact đã tạo. Nếu source gốc đóng gói mà không bundle, bạn có thể nhận được file source gốc đọc được.
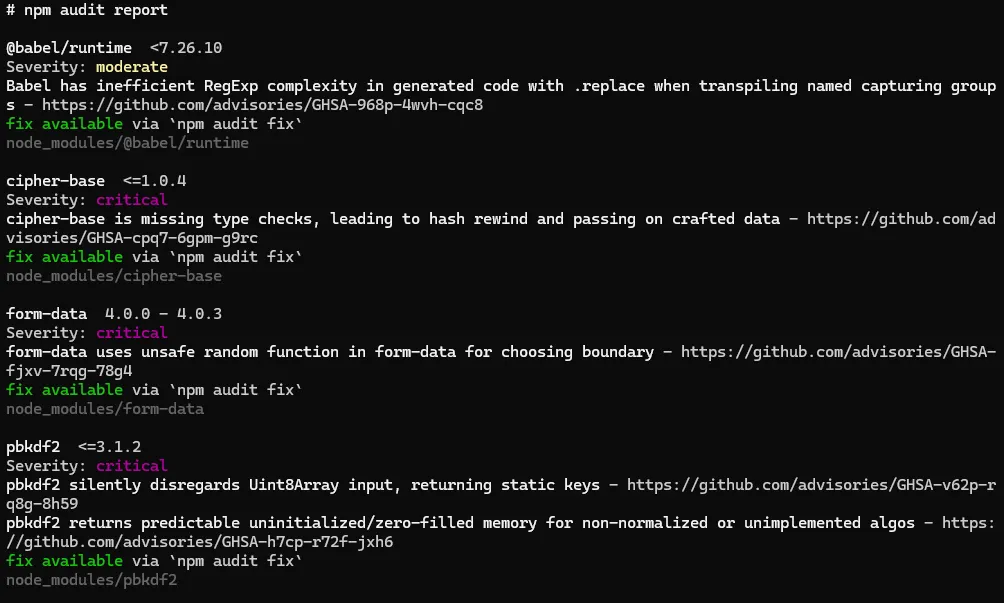
Bước 4: Kiểm tra dependency vulnerabilities
Chạy trong thư mục đã trích xuất:
npm audit
Nếu npm báo thiếu package-lock.json, tạo nó bằng:
npm i --package-lock-only
Chạy lại npm audit:
Bước 5: Xác định entry point
Mở package.json và tìm main file:
"productName": "Simplenote",
"version": "2.23.2",
"main": "desktop/index.js",
File index.js chứa duy nhất một dòng:
require('./app')();
Bước 6: Kiểm tra webPreferences
Kiểm tra cài đặt bảo mật trong app.js:
webPreferences: {
  contextIsolation: true,
  nodeIntegration: false,
  preload: path.join(__dirname, './preload.js'),
},
| Cờ bảo mật | Giá trị | Ý nghĩa |
|---|---|---|
nodeIntegration |
false |
Khi true, renderer có quyền truy cập Node.js APIs qua DOM. XSS có thể gọi hàm Node và dẫn đến thực thi mã. |
contextIsolation |
true |
Đảm bảo preload scripts và Electron internals chạy trong ngữ cảnh JavaScript riêng biệt với nội dung web đã tải. |
Nếu nodeIntegration được bật, XSS có thể dẫn đến Remote Code Execution (RCE).
Các lỗ hổng bảo mật phổ biến & Cấu hình sai trên ứng dụng Electron
1) Debug Mode Enabled
Ứng dụng Electron xây dựng trên Chromium nên có thể debug renderer mode trong giai đoạn phát triển, nhưng trong production flag này phải đặt là false. Dù không có ảnh hưởng chính, sự tồn tại của nó làm tăng các lỗ hổng khác (ví dụ: CVE-2024-36287).
Cách kiểm tra:
- Mở app, kiểm tra menus đặc biệt menu View. Nếu thấy “Toggle Developer Tools”, “Toggle DevTools”, “Developer Tools” → DevTools đang có sẵn.
- Thử phím tắt:
Ctrl+Shift+I,Ctrl+Shift+J, hoặcF12. Nếu cửa sổ DevTools mở → debug enabled. - Right-click trên UI, xem “Inspect” có xuất hiện không.
- Khởi chạy từ command line thay vì double-click. Nếu app in verbose logs → debug output.
- Tìm kiếm
webPreferences.devTools,webContents.openDevTools(),electron-is-dev, hoặcELECTRON_ENABLE_LOGGINGsau khi trích xuất asar.
2) Đọc Runtime Logs qua CLI
Cách kiểm tra:
- Khởi chạy app từ CLI và capture stdout/stderr
- Grep log cho paths, update URLs, temp files, và zip/tar names
- Kiểm tra running process command line và open files
- Kiểm tra filesystem permissions của paths đáng ngờ
Chạy và captures logs:
"/Applications/Simplenote.app/Contents/MacOS/Simplenote" > ~/simplenote-log.txt 2>&1 &
Tìm kiếm chuỗi thú vị trong logs:
grep -iE "(/tmp|temp|update|\.zip|\.tar|autoUpdater|auto-update|download|remote-debugging-port|openDevTools|preload)" ~/simplenote-log.txt | sed -n '1,200p'
Kiểm tra process command line:
pgrep -f Simplenote
ps -o pid,cmd -p <PID>
tr '\0' '\n' < /proc/<PID>/environ | sed -n '1,200p'
Monitor filesystem activity:
sudo apt install inotify-tools
inotifywait -m /tmp -e create,modify,delete --format '%w%f %e' &
Tìm thư mục world-writable:
sudo find / -type d -perm -0002 -ls 2>/dev/null | head -n 200
3) Injection Based Attacks (XSS → RCE)
XSS trong ứng dụng Electron thường được đánh giá high hoặc thậm chí critical, vì Electron kết hợp Chromium và Node.js. Sự kết hợp này cho phép JavaScript được inject chạy với cả khả năng web và native, nên XSS có thể tiếp cận OS-level APIs và thực thi lệnh.
Điều kiện để XSS dẫn đến RCE:
a) Direct Node access trong renderer (nodeIntegration: true)
- JavaScript điều khiển bởi attacker có thể gọi Node APIs như
require('child_process').exec(...), fs methods, và spawn processes. - Cách kiểm tra: Trong DevTools console:
typeof require === 'function' && !!require('fs')
Nếu trả về true → Node APIs có sẵn trong renderer.
b) Preload hoặc exposed API abuse
- Preload script exposes hàm mạnh (ví dụ
window.api.exec(cmd)) có thể được gọi bởi injected script ngay cả khinodeIntegrationbị vô hiệu hóa. - Cách kiểm tra: Tìm preload path trong
BrowserWindowoptions. Kiểm tracontextBridge.exposeInMainWorldhoặc global assignment đếnwindow.*. - Tìm các hàm
exec,run,shell,readFile,writeFile,requiretrong exposed API.
c) Broken context isolation hoặc poor sanitization
- Khi
contextIsolationlàfalse, hoặc code sử dụngeval()hoặcnew Function()không an toàn qua contexts. - Tìm flag
contextIsolationvà usage củaeval,new Function,Functionconstructor,vmusage.
d) Insecure IPC handlers trong main process
- Renderer có thể không có Node, nhưng vẫn gửi IPC messages. Nếu
ipcMainhandlers thực hiện hành động đặc quyền trên input không đáng tin cậy → XSS payload có thể craft IPC messages dẫn đến RCE.
IPC = Inter-Process Communication. Cách renderer process (web page) và main process (Node / app controller) gửi dữ liệu và lệnh cho nhau. Một IPC message đơn giản là một named message (channel) cộng dữ liệu tùy chọn.
Cách kiểm tra IPC:
- Enumerate
ipcMain.handle,ipcMain.on,ipcMain.once - Kiểm tra handler bodies cho
child_process,fs,require,process.env, hoặc remote loading
4) Local Data Exposure Attacks
Hệ điều hành desktop thường không cung cấp sandbox UID cho từng app như Android. Electron apps chạy chung tài khoản OS user với các chương trình local khác, nên bất kỳ process đồng trú nào cũng có thể đọc file hoặc tương tác với services tạo bởi ứng dụng Electron.
Cách giảm thiểu:
- Sử dụng platform secure storage (Keychain, DPAPI, libsecret, hoặc
keytar) - Thực thi owner-only file permissions
- Mã hóa dữ liệu nhạy cảm
- Yêu cầu xác thực cho local IPC hoặc HTTP endpoints
5) App Surface và Navigation
In-app Navigation Testing
Navigation controls trong BrowserWindow quyết định nơi renderer được phép truy cập.
Cách kiểm tra:
grep -R "will-navigate\|setWindowOpenHandler" -n .
Cần thấy cả hai:
win.webContents.on('will-navigate', e => { e.preventDefault(); });
win.webContents.setWindowOpenHandler(() => ({ action: 'deny' }));
Cách test từ DevTools:
location.href = 'https://evil.tld';
window.open('https://evil.tld');
Custom Protocol và Deep Link Traversal
protocol.register* và app.setAsDefaultProtocolClient xử lý myapp:// links.
Cách kiểm tra:
grep -R "protocol.register" -n .
grep -R "app.setAsDefaultProtocolClient" -n .
Test từ shell:
myapp://../../etc/passwd
myapp://file///C:/Windows/system.ini
myapp://?url=\\attacker\share\icon.ico
External Openers
APIs như shell.openExternal và shell.openPath.
grep -R "shell.openExternal\|openPath" -n .
Wrap calls với allowlist:
const ALLOWED_HOST = 'example.com';
function safeOpenExternal(raw) {
  const u = new URL(raw);
  if (u.protocol !== 'https:' || u.host !== ALLOWED_HOST) return false;
  return shell.openExternal(u.href);
}
6) WebPreferences và Renderer Policy
Baseline an toàn cho mọi window/view:
new BrowserWindow({
  webPreferences: {
    sandbox: true,
    contextIsolation: true,
    nodeIntegration: false,
    webSecurity: true,
    allowRunningInsecureContent: false,
    enableRemoteModule: false
  }
});
Kiểm tra tại runtime:
win.webContents.getLastWebPreferences()
| Flag | Giá trị khuyến nghị | Lý do |
|---|---|---|
sandbox |
true |
Giới hạn renderer trong sandbox Chromium |
contextIsolation |
true |
Cách ly preload context khỏi renderer |
nodeIntegration |
false |
Chặn Node.js access từ renderer |
webSecurity |
true |
Thực thi same-origin policy |
allowRunningInsecureContent |
false |
Blocks mixed content |
enableRemoteModule |
false |
Vô hiệu hóa remote module nguy hiểm |
7) Update và Supply Chain
Auto-update logic và staging paths.
Cách kiểm tra:
grep -R "autoUpdater\|electron-updater\|Squirrel" -n .
Cách test:
- Bật updater logs, trigger update
- Monitor temp paths:
- Windows: Procmon trên
%TEMP%và%LOCALAPPDATA% - macOS:
fs_usagehoặc Console - Linux:
inotifywait -m /tmp
Fix:
- Yêu cầu signed releases với verified hashes
- Lock down staging permissions
- Reject unsigned hoặc mismatched builds
Phương pháp kiểm thử thực tế từng bước
Phase A: Recon
Thu thập binaries & metadata
- Lấy installer/app bundle cho mỗi nền tảng đang test (macOS
.app, Windows installer, Linux package). Ghi phiên bản ứng dụng.
Trích xuất bundle
- Trích xuất
app.asar(nếu có) bằngnpx asar extract app.asar out/hoặc unpack bất kỳ bundle format nào ứng dụng sử dụng.
Thiết lập lab
- Sử dụng VM snapshots và mạng cô lập. Có Burp/mitmproxy sẵn cho network interception, Frida cho runtime hooks, và local CA tin tưởng Burp.
Phase B: Static Analysis
Tìm flags nguy hiểm:
grep "nodeIntegration|contextIsolation|preload|webPreferences|--disable-web-security|allowRunningInsecureContent|enableRemoteModule|ipcMain|child_process|eval" .
- Xác định: mọi
new BrowserWindow,webview, vàprotocol.register*calls.
Audit preload scripts
- Mở
preload.jsvà enumeratecontextBridge.exposeInMainWorldcalls. Flag bất kỳ hàm nào: execute commands, write files, require arbitrary modules, hoặc evaluate strings.
Tìm secrets & endpoints
- Grep cho
_API_KEY_,token,secret, hoặc plain credentials; ghi chú hardcoded endpoints hoặc update URLs.
Phase C: Runtime Inspection
Chạy app từ terminal & captures logs
- Launch binary từ CLI để capture stdout/stderr. Tìm temporary paths, update messages, hoặc stack traces.
Mở DevTools / kiểm tra window globals
- Test
window.process,window.require,Object.keys(window).
Enumerate IPC channels
- Static: tìm
.send('channel'vàipcMain.on('channel'pairs. - Dynamic: từ console thử
window.ipcRenderer && window.ipcRenderer.send('channel', {}).
Phase D: Exploit Vectors
Renderer XSS checks
- Test user-input rendering points với payloads benign:
<img src=x onerror=console.log('XSS')>.
Preload & Node access escalation
- Nếu
nodeIntegration: truehoặc preload exposes dangerous APIs:require('child_process').exec('whoami').
IPC fuzzing
- Gửi payloads bất ngờ đến
ipcRenderer.invokehoặc.sendchannels.
Update flow testing
- Reproduce update workflow và monitor download paths.
Native module checks
- Xác định
.nodefiles và research CVEs.
Cách chặn requests bằng Burp Suite
- Cài đặt Burp certificate trên hệ thống
- Vào cài đặt Windows, tìm “proxy”
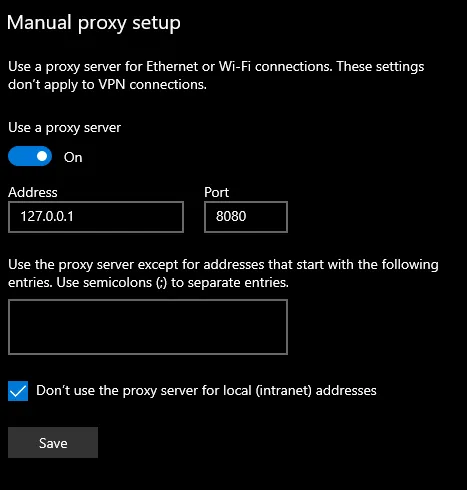
- Thiết lập Burp proxy:
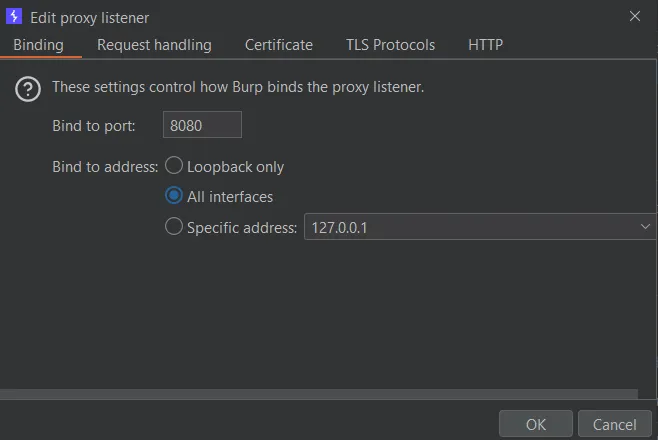
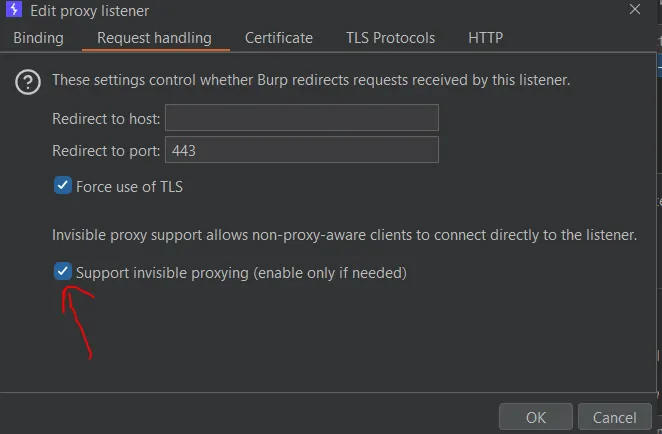
- Khi app gửi/nhận requests, chúng sẽ xuất hiện trên Burp Suite. Có thể gửi đến Repeater để test backend vulnerabilities như IDOR, SQLi, SSRF…
Nếu app không respect proxy settings:
C:\Users\<username>\AppData\Local\Programs\Simplenote\Simplenote.exe --proxy-server="http://127.0.0.1:8080"
Với Simplenote, app sẽ gửi upgrade request chuyển sang WebSocket:
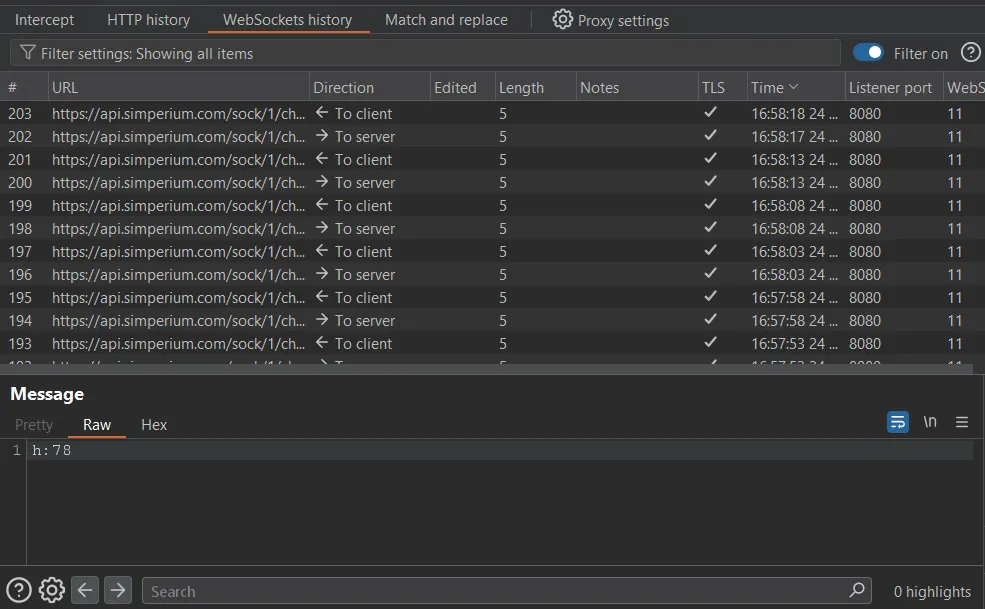
Nếu SSL pinning được áp dụng, có hai lựa chọn:
- Dùng Frida script để hook và vô hiệu hóa SSL pinning checks
- Patch file ASAR để vô hiệu hóa hàm và rebuild lại
Electron Security Best Practices
| Thực hành | Chi tiết | Rủi ro nếu bỏ qua |
|---|---|---|
| Secure baseline | nodeIntegration:false, contextIsolation:true, sandbox:true, webSecurity:true | Renderer bugs → RCE |
| Block navigation/popups | Deny will-navigate, sử dụng setWindowOpenHandler | Open redirect, tab-jacking |
| Harden webview | Ưu tiên BrowserView, không allowpopups | Renderer yếu → weak link |
| Preload discipline | API nhỏ qua contextBridge, không child_process, fs, eval | XSS → native power |
| IPC validation | Kiểm tra event.sender.getURL() và validate args | Renderer → main privilege escalation |
| Secure external openers | Guard shell.openExternal, reject javascript:, file:, data: | Code exec, credential leak |
| Safe custom protocols | Normalize, block .., file: passthrough | Path traversal, NTLM leak |
| Strict CSP | No unsafe-inline, tight default-src ‘self’ | Renderer XSS |
| Remove XSS sinks | Tránh innerHTML, dangerouslySetInnerHTML, executeJavaScript | Injection → RCE |
| Update hardening | Signed updates, HTTPS feeds, hash verification | Supply chain hijack |
| Secrets at rest | OS keystores, safeStorage, HttpOnly cookies | Token theft |
| Permission gate | session.setPermissionRequestHandler, deny by default | Camera, mic, screen abuse |
| Network allowlist | Block localhost, RFC1918, metadata IPs | SSRF |
| WebSocket origin enforcement | Verify Origin và subprotocols | Cross-origin WS hijack |
| File safety | Canonicalize paths, check symlinks, validate extensions | Traversal, unexpected execution |
| Build/runtime flags | Không –no-sandbox, –disable-web-security, –remote-debugging-port | Vô hiệu hóa phòng thủ cốt lõi |
| Version budget | Giữ Chromium trong window (ví dụ 8 tuần sau stable) | Public engine RCEs |
| Platform hardening | Windows: DLL side-loading; macOS: hardened runtime; Linux: Flatpak/Snap | Platform-specific attacks |
| Logging hygiene | Scrub tokens/PII, TLS only, rate limits | Data exposure |
| Startup self-tests | Enumerate windows, assert baseline, exit nếu vi phạm | Silent regression |
| DevTools off in prod | Ẩn DevTools, remove remote debugging | Debug surface abuse |
| Dependency hygiene | Inventory .node binaries, check CVEs, update libs | Native code vulnerabilities |
Tài liệu tham khảo chuyên sâu
- NDSS 2023 – Nghiên cứu bảo mật Electron
- Bitwarden Electron Desktop App Security Assessment Report 2023
- Cure53 – IVPN Pentest Report
- Cure53 – Influx Wallet Pentest Report
- Obsidian Cure53 Audit Full Report
- BlackHat Asia 2019 – Preloading Insecurity in Electron
- Clore.ai Pentest Report
- Electronegativity – A Study of Electron Security
Source link: DeepStrike – Penetration Testing of Electron-based Applications